Why Modern Roof Lanterns Are Essential for Modern Homes
Modern roof lanterns have turned into crucial features in modern homes. They work to improve natural light, creating inviting spaces that merge interior and exterior environments. Beyond appearance, these structures offer energy conservation that can result in cost savings. As homeowners look for innovative ways to enhance their living spaces, the role of roof lanterns becomes increasingly significant. What are the specific benefits and designs that make them a attractive choice for today's residences?
The Benefits of Natural Light in Your Home
While many householders work toward ways to refine their home interiors, the value of natural light often escape notice. Natural light has a marked bearing on the ambiance and operation of a home. It not only floods spaces but also imparts an inviting atmosphere, building a sense of vitality. Exposure to sunlight is known to lift spirits and energy levels, making rooms feel more vibrant and alive.
In addition, natural light can lower dependence on electric lights, resulting in potential energy savings. It assists in showing off architectural elements and decor, boosting the overall aesthetic appeal of a home. Also, daylight can aid in better indoor air quality by encouraging ventilation when windows are opened. By utilizing natural light, homeowners can craft pleasant spaces that encourage comfort and health, ultimately changing the way they experience their living environments.

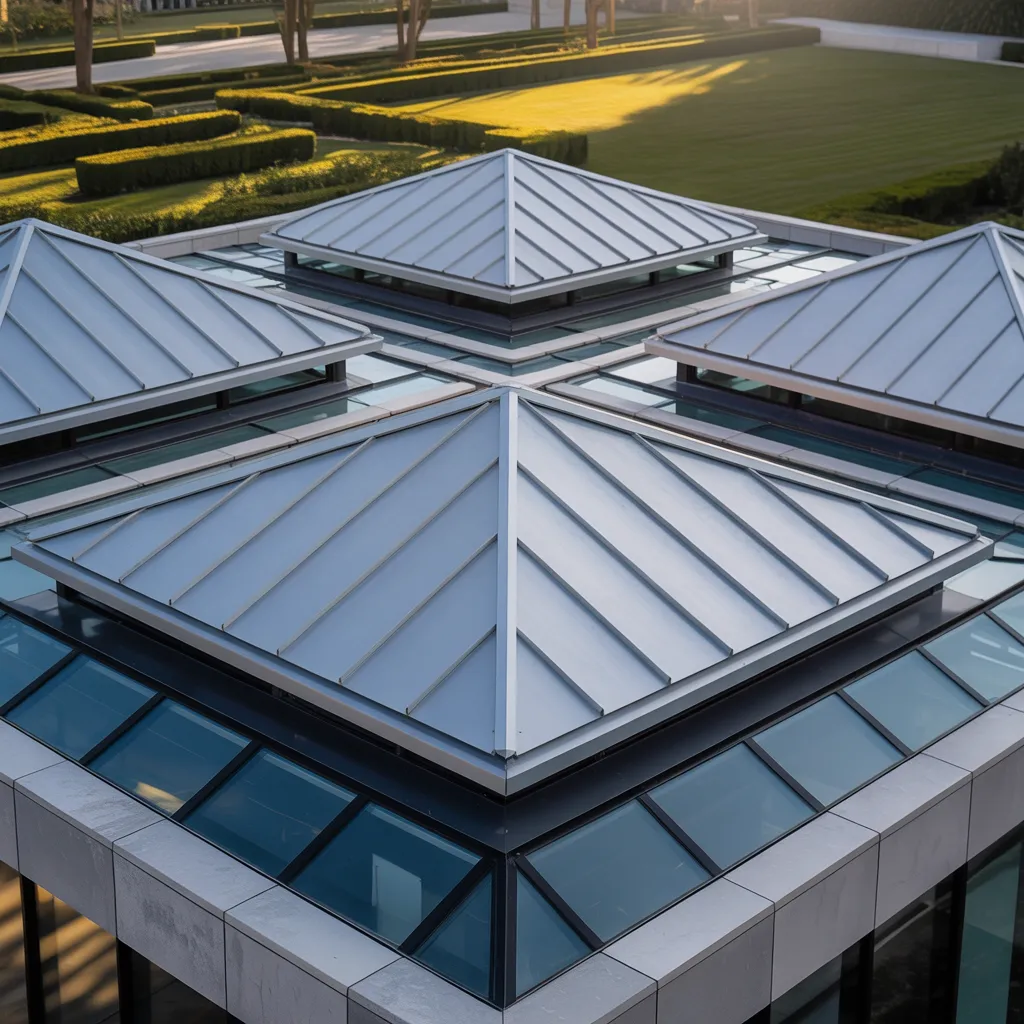
How Roof Lanterns Strengthen Space and Visual Character
Roof lanterns substantially boost both aesthetics and space in current homes. By facilitating generous natural light to seep deep into living areas, these architectural features create an impression of expansiveness and light. This influx of light not only illuminates interiors but also highlights design elements, making rooms appear more appealing and open.
In addition, roof lanterns stand as impressive design focal points, delivering a degree of polish and elegance to contemporary building designs. Their elegant profiles and multiple design options, moving between subdued approaches to intricate, can work harmoniously with a spectrum of spatial design philosophies. The shifting contrast of illumination achieved through roof lanterns meaningfully enriches the visual dimension, accentuating colors and textures throughout the space.
Beyond their visual contributions, roof lanterns can smoothly merge indoor and outdoor spaces, promoting a sense of unity. This perfect union of function and design makes roof lanterns a key element in the design of modern homes.
How Roof Lanterns Minimize Energy Usage and Costs
By increasing daylight, skylights significantly decrease the need for artificial lighting, resulting in significant cost reductions. This influx of daylight not only illuminates interiors but also reduces dependence on electricity, particularly during daytime hours. As a result, homeowners can enjoy reduced energy costs while supporting a more sustainable environment.
Moreover, roof lanterns can improve energy performance. Many contemporary styles include double or triple glazing, which helps to retain heat during colder months and minimize heat gain in the summer. This temperature control can lower the requirements for heating and cooling systems, further lowering energy costs.
Moreover, the visual beauty of roof lanterns can elevate a property's market value, making them a excellent investment. Overall, the fusion of decreased power consumption and long-term financial benefits demonstrates why roof lanterns are an critical feature for modern homes.
The Most Excellent Roof Lantern Styles for Your Home
Choosing the right style of roof lantern can noticeably uplift both the aesthetic and functional aspects of a contemporary home. Numerous styles cater to diverse architectural inclinations. As an example, classic pyramid-shaped lanterns exude a classic elegance, while flat or pitched designs harmonize with minimalist aesthetics. Skillion lanterns, featuring angled roofs, offer a contemporary twist, allowing for ideal light diffusion.
Furthermore, the selection of substances plays a significant role. Aluminum frames are favored for their durability and modern appearance, whereas wooden frames can add warmth and charm. Customizable options, such as dimensions and glazing, enable homeowners to customize lanterns to their specific needs.
Furthermore, geometric designs, displaying octagonal or hexagonal shapes, can deliver a striking focal point, amplifying both natural light and visual interest. Ultimately, selecting the right roof lantern style not only elevates the home's design but also maximizes its functional benefits.
What is the Process for Installing Roof Lanterns?
Installing roof lanterns requires a clear comprehension of essential tools and a methodical process. Proper preparation guarantees a successful installation, enhancing both aesthetics and performance. This section outlines the necessary equipment and detailed guidelines for achieving ideal results.
Vital Tools Required
A range of crucial tools is necessary for the proper installation of roof lanterns. First, a measuring tape ensures accurate dimensions for the lantern and the roof opening. A spirit level is critical for verifying that the lantern will sit evenly. A power drill, along with appropriate drill bits, is necessary for creating holes for screws and fittings. Additionally, a saw, typically a circular saw, may be required for cutting the roof structure if modifications are necessary. Safety gear, including gloves and goggles, is also essential to protect the installer. Finally, a silicone sealant gun is important for applying waterproof sealant around the edges, ensuring a secure and weatherproof installation. Each tool plays a significant role in achieving a professional finish.
Sequential Setup Process
Initiate the placement of roof lanterns by preparing the workspace and confirming all tools are ready. First, take away the existing roof material carefully to prevent damage to the surrounding area. Next, assemble a support frame, confirming it is level and securely attached to the roof structure. After the frame is secured, apply a waterproof membrane to prevent leaks. Carefully place the roof lantern onto the frame, aligning it properly. Secure the lantern using screws or brackets as recommended by the manufacturer. Following installation, inspect for any gaps and seal them with appropriate weatherproofing materials. In conclusion, replace the surrounding roofing material, providing a seamless finish. Clean the installed lantern for ideal light transmission and admire the transformation.
Maintenance Tips for Long-Lasting Roof Lanterns
Maintaining roof lanterns is crucial for guaranteeing their durability and performance. A regular cleaning schedule, combined with periodic inspections of weatherproofing and connections, can help prevent deterioration. Additionally, applying mild cleaners is important to avoid harming the surfaces.
A frequent sanitation routine
How often should homeowners clean their roof lanterns to ensure optimal clarity and longevity? Consistent maintenance is crucial to preserve the aesthetic and functional aspects of roof lanterns. Experts recommend a twice-yearly cleaning schedule, ideally in spring and autumn. This guarantees that any accumulated dirt, debris, or stains are effectively removed before they become more challenging to handle. Homeowners should use a soft cloth and a mild detergent to avoid scratching the glass surface. It's also beneficial to check for any evidence of mildew or mold during cleaning, as these can affect both appearance and performance. By adhering to this cleaning routine, homeowners can extend the lifespan of their roof lanterns and enjoy continuous natural illumination in their contemporary spaces.
Check Seals and Joints
Regular inspections of seals and joints are essential for the durability of roof lanterns. Over time, these critical parts can deteriorate because of weather influences, causing potential leaks and structural damage. Homeowners should carry out checks at least twice per year, monitoring any signs of deterioration, including cracks or gaps. Promptly handling these problems can stop water ingress and maintain the soundness of the lantern. Moreover, applying proper sealants can improve their performance and longevity. This proactive approach not only preserves the roof lantern but also supports the overall energy efficiency of the home. Making sure seals and joints are in top condition is a essential part of roof lantern upkeep.
Stay Away from Severe Chemicals
Proper care of roof lanterns extends beyond checking seals and joints; it also involves mindful cleaning practices. To promote longevity, it is essential to avoid harsh chemicals that can damage the materials of the lantern. Strong detergents and abrasive cleaners may cause marks or degrade the surface over time. Instead, a gentle solution of warm water and mild soap is recommended, allowing for efficient cleaning without risking harm. Soft cloths or sponges should be used to avoid scratching the glass or frame. Routine maintenance with suitable cleaning methods will help maintain the aesthetic and functional qualities of roof lanterns, guaranteeing they remain a beautiful feature of contemporary homes for years to come.
Roof Lantern Transformations: Real-Life Examples
A roof lantern greatly improves both design quality and usability in today's properties. One excellent case study is a London-based family that exchanged a traditional skylight with a elegant, contemporary roof lantern in their kitchen. This installation not only flooded the space with natural light but also formed a notable visual statement acting as a conversation starter.
In another example, a minimalist home in Sydney incorporated a large roof lantern above an open-plan living area, effortlessly merging indoor and outdoor environments. This design choice not only improved energy efficiency but also provided stunning views of the night sky.
Furthermore, a refurbished Victorian house in Manchester displayed a geometric roof lantern that stood out elegantly with the original architecture, highlighting the harmony between old find here and new. These actual case studies demonstrate how roof lanterns can transform areas, making them more inviting and visually appealing while maximizing natural light.
Frequently Inquired Questions
Are Roof Lanterns Suitable for All Types of Roofs?
Roof lanterns can be suitable for different roof types, including flat, pitched, and vaulted roofs. However, adequate installation and design factors are crucial to secure performance and visual attractiveness across diverse architectural styles.
Is it possible to place ceiling skylights in established residences?
Roof lanterns can truly be placed in existing homes, provided structural integrity and design considerations are handled. Professional assessment confirms compatibility with the existing roof framework, increasing natural light and aesthetic appeal without compromising safety.
What Materials Do Roof Lanterns Typically Get Made From?
Roof lanterns are typically made from such as aluminum, glass, and polycarbonate. Aluminum provides strength and durability, while glass allows for natural light, and polycarbonate offers lightweight, impact-resistant alternatives, ensuring versatility and functionality.
Do You Need Planning Permission for Roof Lanterns?
Roof lanterns generally do not require planning permission if they adhere to specific guidelines, such as size and location. However, regulations can vary by area, so consulting with local authorities is prudent for clarity.
How do roof lanterns perform in severe weather environments?
Roof lanterns are engineered to tolerate extreme weather, featuring durable materials and robust construction. Proper placement and servicing optimize their performance, assuring they resist heavy winds, rain, and snow while maintaining structural integrity and aesthetics.